I have been lucky enough to have been granted a permit for the Acoustic Festival of Britain this year which gives me prime position at the stage allowing me to get some decent photos. Looking forward to seeing Hayseed Dixie again as they always put on a really good show and this will be the first time seeing them in a festival setting.
Wednesday, 2 March 2011
Wednesday, 9 February 2011
When photographing with available light = WIN
I recently attended a local dance performance as a spectator, I left the external flash behind thinking it would be off putting for the performers to be blasted with a flash. Well it turned out the “pro” hired for the event had brought their flash and was not scared of using it. They fired their flash directly at the performers no diffusers, reflectors or bouncing off a wall or ceiling, just firing face on from about 1.5 meters away. They may have had their reasons but to me their photos lost all feeling and atmosphere of the performances, all the photos where lit up like a flood light and all light from the lighting rig used for the dance routines was blanketed in the light from their external flash resulting in unflattering harsh shadows.
After seeing what the their photos came out like I am glad I decided not to use my flash unit and instead use what light was available, it allowed me to take photos like this:
 |
| Post Processing - Selective sharpening, noise reduction and contrast boost. |
Its times like this when a fast lens really pays off.
Revisiting old photos and applying new techniques.
I will often revisit my older photos to see what new techniques I have learned can be applied to make an “ok” photo something that has a little more impact. Both photos taken below were just holiday snaps which I thought would look good but once I got the images off the camera and on to the computer decided something was missing or they lacked impact. However this was before I started dabbling in post processing and by doing some selective sharpening, noise reduction, increasing contrast and playing around with the curves and saturation then you can very quickly and simply give a photo more “pop”.
 |
| Royal Parade in London |
 |
| Fresh octopus in a restaurant on the Greek island of Skiathos |
Thursday, 3 February 2011
Why should you shoot in RAW instead of JPEG
So what is this RAW format I speak about?
First lets see what happens when you take a photo as a JPEG. You have lined up your shot and press the shutter button, the light passes through the lens and onto the image sensor from here the data is passed onto a processing chip in the camera which takes this data and performs various “enhancements”, it will sharpen (non selectively), increase contrast, saturation, brightness and will perform noise removal. It will then compress the file as a JPEG by removing data which it thinks is not required, and there you have it, your JPEG image.
The information that was removed when the data was compressed into the JPEG format is gone and cannot be retrieved, this missing data could have held useful details in blown out highlights or in the under exposed areas of your photos that had you known it was there may have been able to rescue in post processing. This is where the RAW format sometimes known as digital negatives come into play. The RAW format offers a deeper and richer tone to colours and offers more control over the exposure levels during editing. Editing of a RAW file in post processing software will not degrade over multiple edits like a JPEG can.
Obviously there are uses for JPEG images, if your camera has a small buffer then shooting in RAW is going to affect the burst rate and will mean you won’t be able to take as many images in quick succession. The file sizes when using RAW are what put most people off, for a 10megapixel camera a single JPEG image can be around 3-5meg in size whereas the same image in RAW will be around 40-60meg and so if you're not careful you will quickly fill your memory cards.
I will try if I get time to follow up this article with some examples of using RAW images to rescue blown out highlights or underexposed regions in photos.
Saturday, 22 January 2011
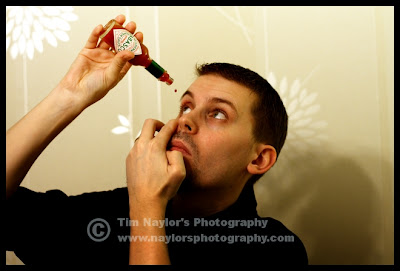
Tabasco Eye Drops - Quick Tutorial
Seen this and similar shots around on Flickr so thought I would have ago at reproducing something along the same lines.
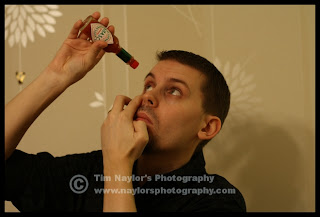
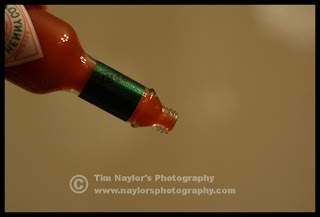
So this shot is composed of the following to shots:
Once you have these two shots you need to add the to your post processing software of choice as separate layers with the bottle of Tabasco as the bottom layer. You need to use the transform tools to rotate the bottle to match the same angle as the bottle you're holding and also resize it so the two bottles line up exactly on top of each other. Now in the layers panel you want to add a layer mask to the top layer and set it to "White (Full Opacity)" not in your tools panel select the eraser making sure the eraser colour is set to white with a soft edged brush type. The next step is really easy all you want to do is on the top layer erase the bottle top which should reveal the layer below which should be the bottle without a bottle top, you may need to mess around with the curves tool to make sure the colours of the two layers match). The final stage differs depending on which post processing tool you have chosen but all you need to do is add small circle and select the colour to be the same as in the bottle of Tabasco, then add some motion blur to give the impression the drop is falling. Depending on what package you are using you can even add some lighting and reflection to the drop to make it more realistic.
 |
| Click for a larger photo. |
 |
| Top Layer (With bottle cap) |
 |
| Bottom Layer (Without bottle cap) |
Once you have these two shots you need to add the to your post processing software of choice as separate layers with the bottle of Tabasco as the bottom layer. You need to use the transform tools to rotate the bottle to match the same angle as the bottle you're holding and also resize it so the two bottles line up exactly on top of each other. Now in the layers panel you want to add a layer mask to the top layer and set it to "White (Full Opacity)" not in your tools panel select the eraser making sure the eraser colour is set to white with a soft edged brush type. The next step is really easy all you want to do is on the top layer erase the bottle top which should reveal the layer below which should be the bottle without a bottle top, you may need to mess around with the curves tool to make sure the colours of the two layers match). The final stage differs depending on which post processing tool you have chosen but all you need to do is add small circle and select the colour to be the same as in the bottle of Tabasco, then add some motion blur to give the impression the drop is falling. Depending on what package you are using you can even add some lighting and reflection to the drop to make it more realistic.
Wednesday, 12 January 2011
Les Paul Guitar
Decided to try my hand at some black and white (b&w) photos of things around the house and thought my guitar was an obvious choice.
For this photo i used the Canon nifty fifty (50mm 1.8) lens with a aperture of 2.2 to give a sharp but shallow depth of field (dof) in post processing (pp) I used the channel mixer functionality in GIMP to convert to b&w added a foreground to background gradient overlay to bring the focus of the eye onto the knob on the lower left quadrant of the photo. The photo was sharpened using a smart sharpening plugin and the contrast was increased to make the image pop. Contrast can be increased alot more in b&w photos than would normaly be acceptable in colour photos and is the best way to make your b&w photos stand out.
For this photo i used the Canon nifty fifty (50mm 1.8) lens with a aperture of 2.2 to give a sharp but shallow depth of field (dof) in post processing (pp) I used the channel mixer functionality in GIMP to convert to b&w added a foreground to background gradient overlay to bring the focus of the eye onto the knob on the lower left quadrant of the photo. The photo was sharpened using a smart sharpening plugin and the contrast was increased to make the image pop. Contrast can be increased alot more in b&w photos than would normaly be acceptable in colour photos and is the best way to make your b&w photos stand out.
 |
| Epiphone Les Paul Studio Guitar |
Subscribe to:
Comments (Atom)

